EssentialsX Discord
EssentialsX Discord is a module that brings a simple, lightweight, easy-to-use, and bloat-free bridge between Discord and Minecraft.
EssentialsX Discord offers essential features you'd want from a Discord bridge such as:
- MC Chat -> Discord Channel
- Discord Channel -> MC Chat
- Basic MC -> Discord Event Monitoring (Join/Leave/Death/Mute)
- MC Console -> Discord Relay
- Discord Slash Commands
- /execute - Execute console commands from Discord
- /msg - Message Minecraft players from Discord
- /list - List players currently online on Minecraft
- & more...
Table of Contents
Initial Setup
Before starting your server, there are a few steps you have to take. First, you must create a new Discord bot at discord.com/developers/applications.
Once on that page, click on "New Application" button on the top right, give your bot a name, and then click "Create".
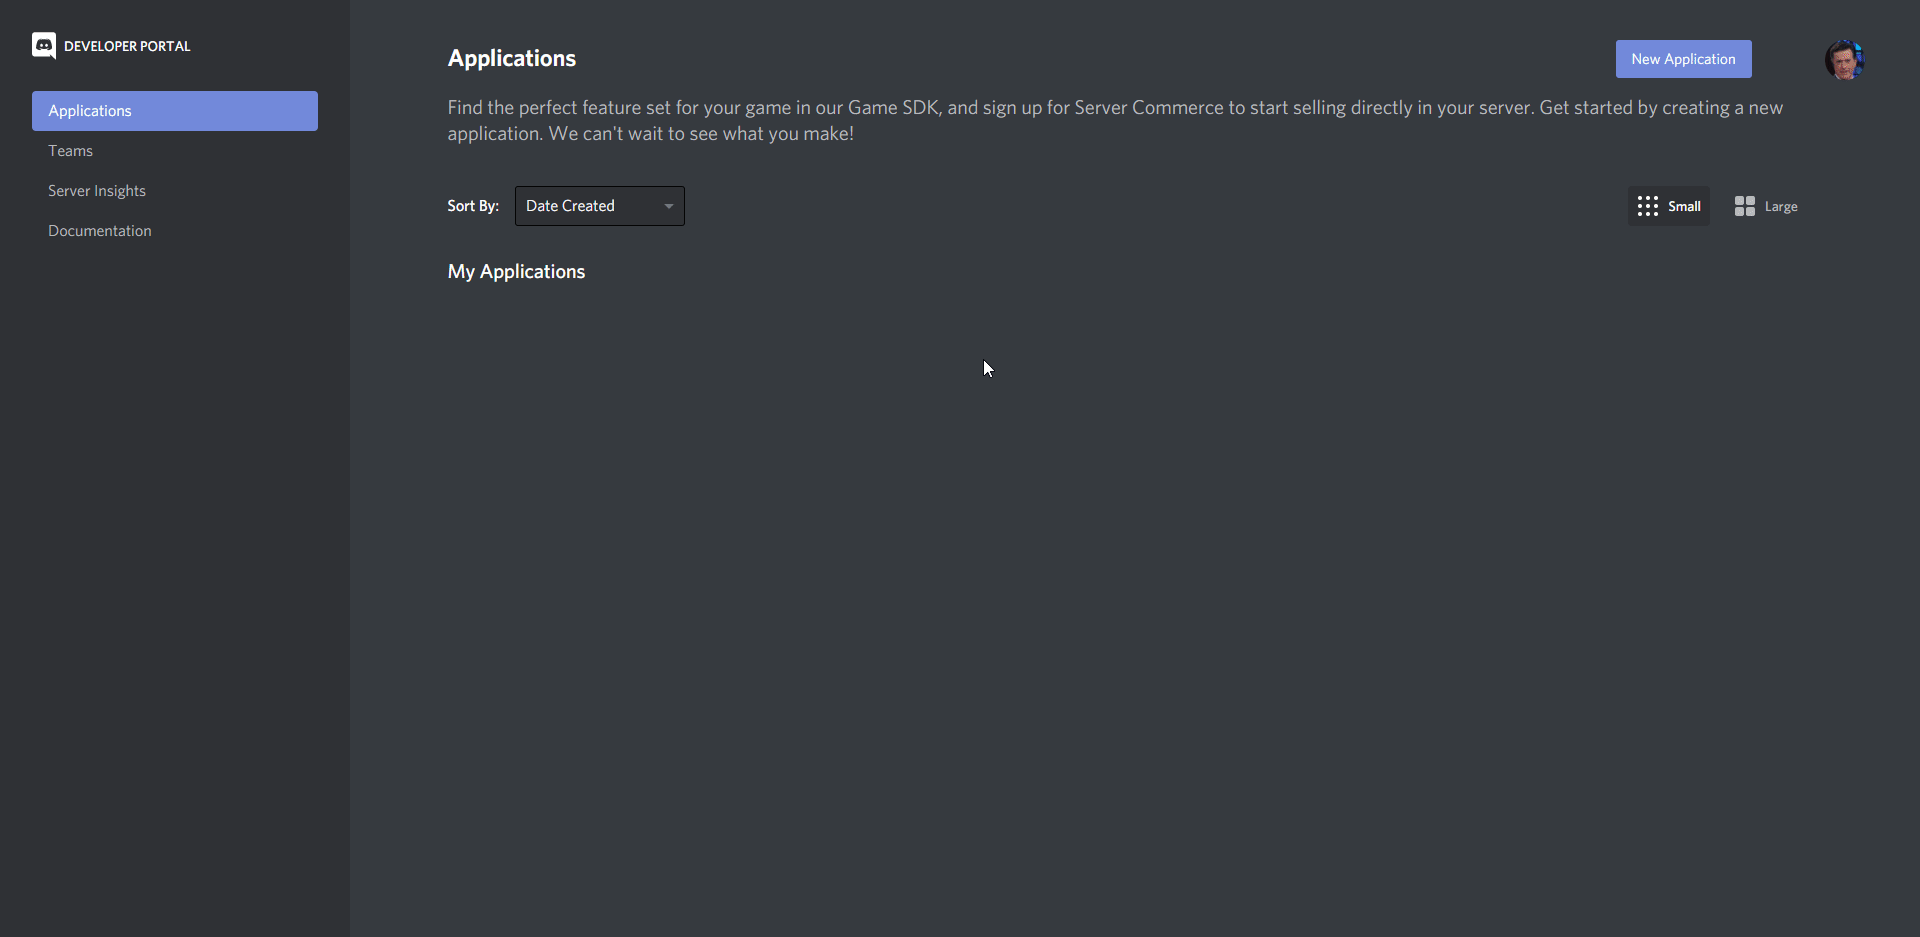
New Application-> Give Application a Name ->Create
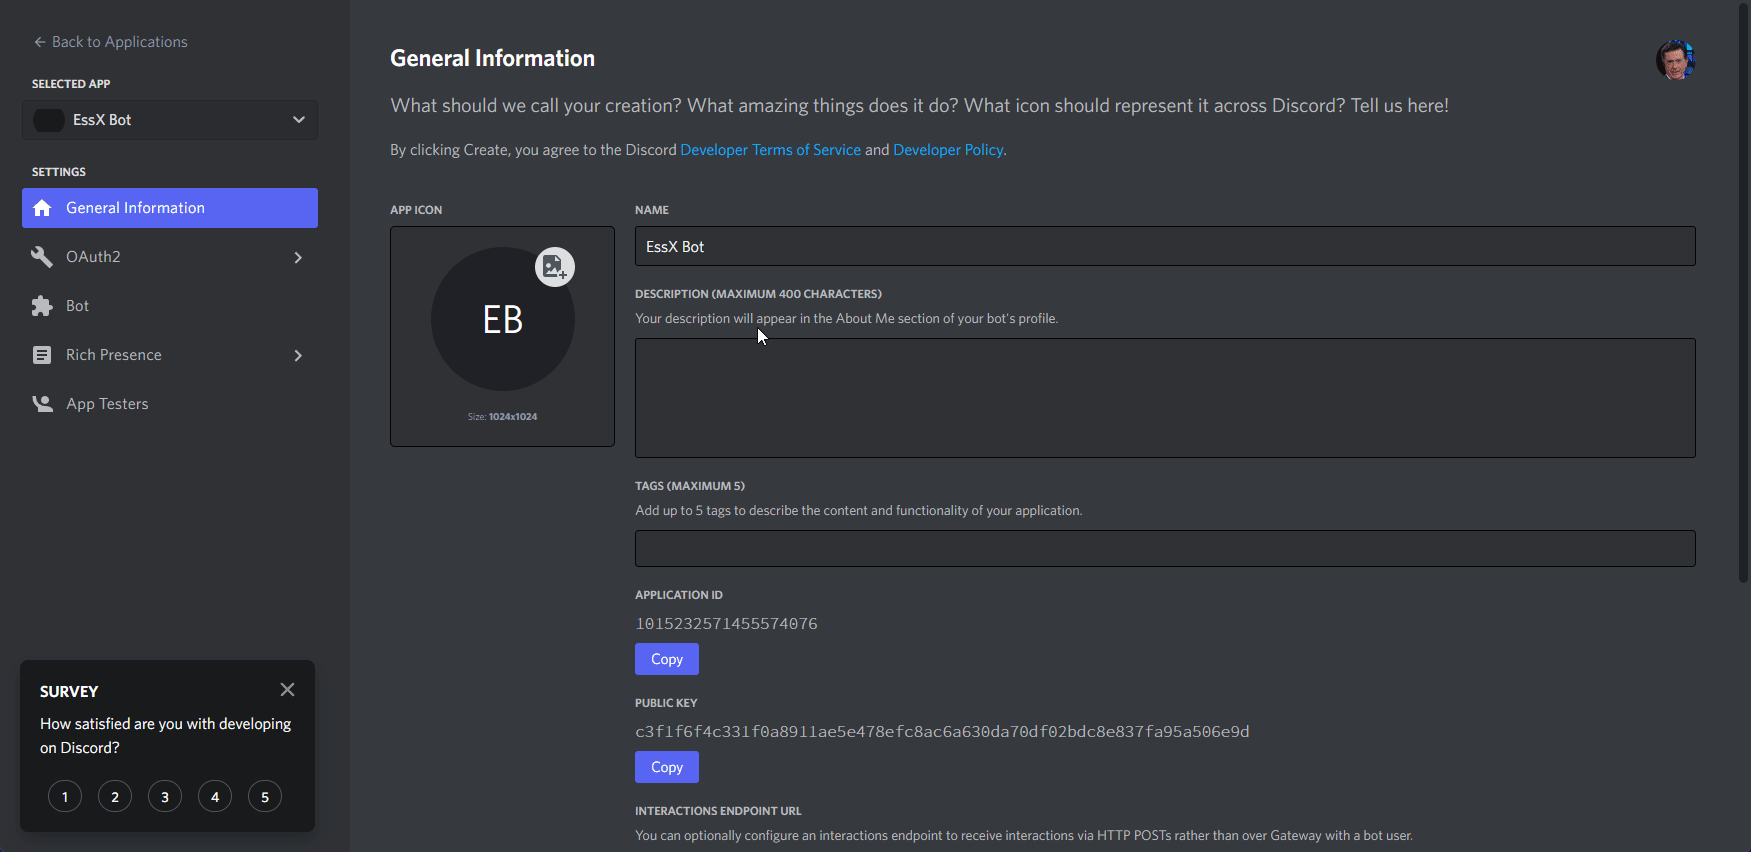
- Once you create the application, you'll be directed to its overview. From this screen, you'll need to copy your "Application ID" and save it for a later step. To copy your Application ID, click the upper-left most blue "Copy" button. Make sure to save it for a later step.
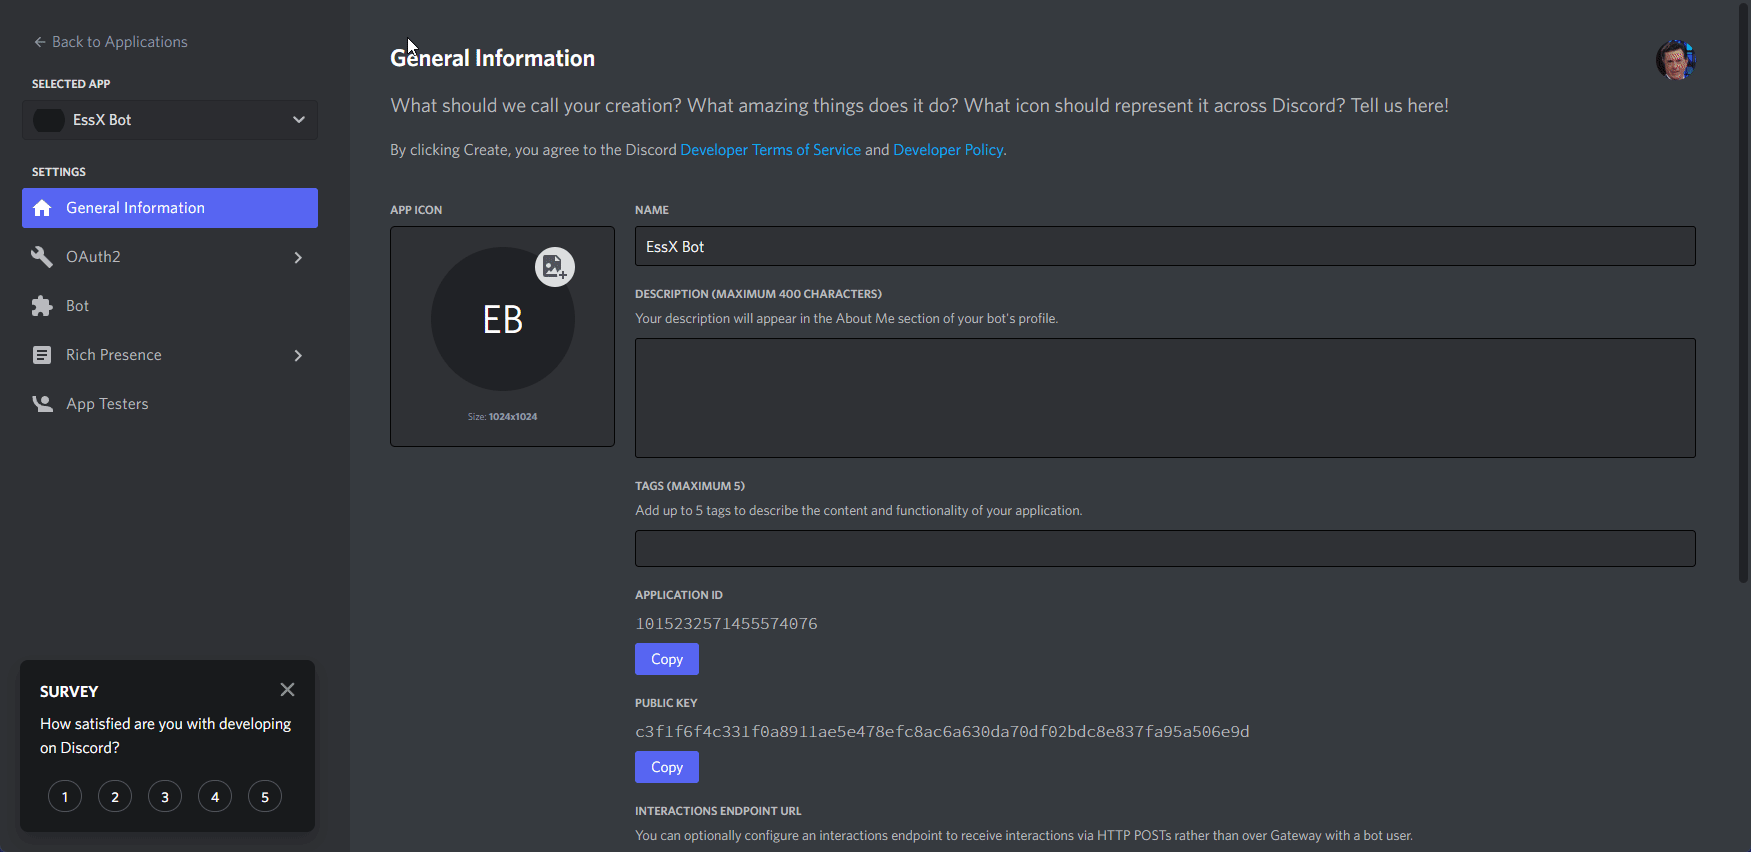
Copy-> Paste into Notepad for later step
- Optionally, you can set an icon for your application as it will be the icon for the bot too.
- The next step is actually creating a bot user for your application. From the overview screen, this is done by going to the "Bot" tab on the left, then clicking the "Add Bot" on the right, and finally then clicking "Yes, do it!".
Bot->Add Bot->Yes, do it!
- Once on this screen, you'll need to uncheck the "Public Bot" setting, enable all the "Privileged Intents", and then click "Save Changes". This prevents other people from adding your bot and also allows your bot to use more Discord features.
Uncheck
Public Bot-> CheckPresence Intent-> CheckServer Members Intent-> CheckMessage Content Intent-> Save Changes`
- Finally, you'll need to copy your bot's token and save it for a later step. To copy your bot's token, click the blue "Reset Token" button right of your bot's icon, then click "Yes, do it!", and finally click "Copy". Make sure to save it for a later step.
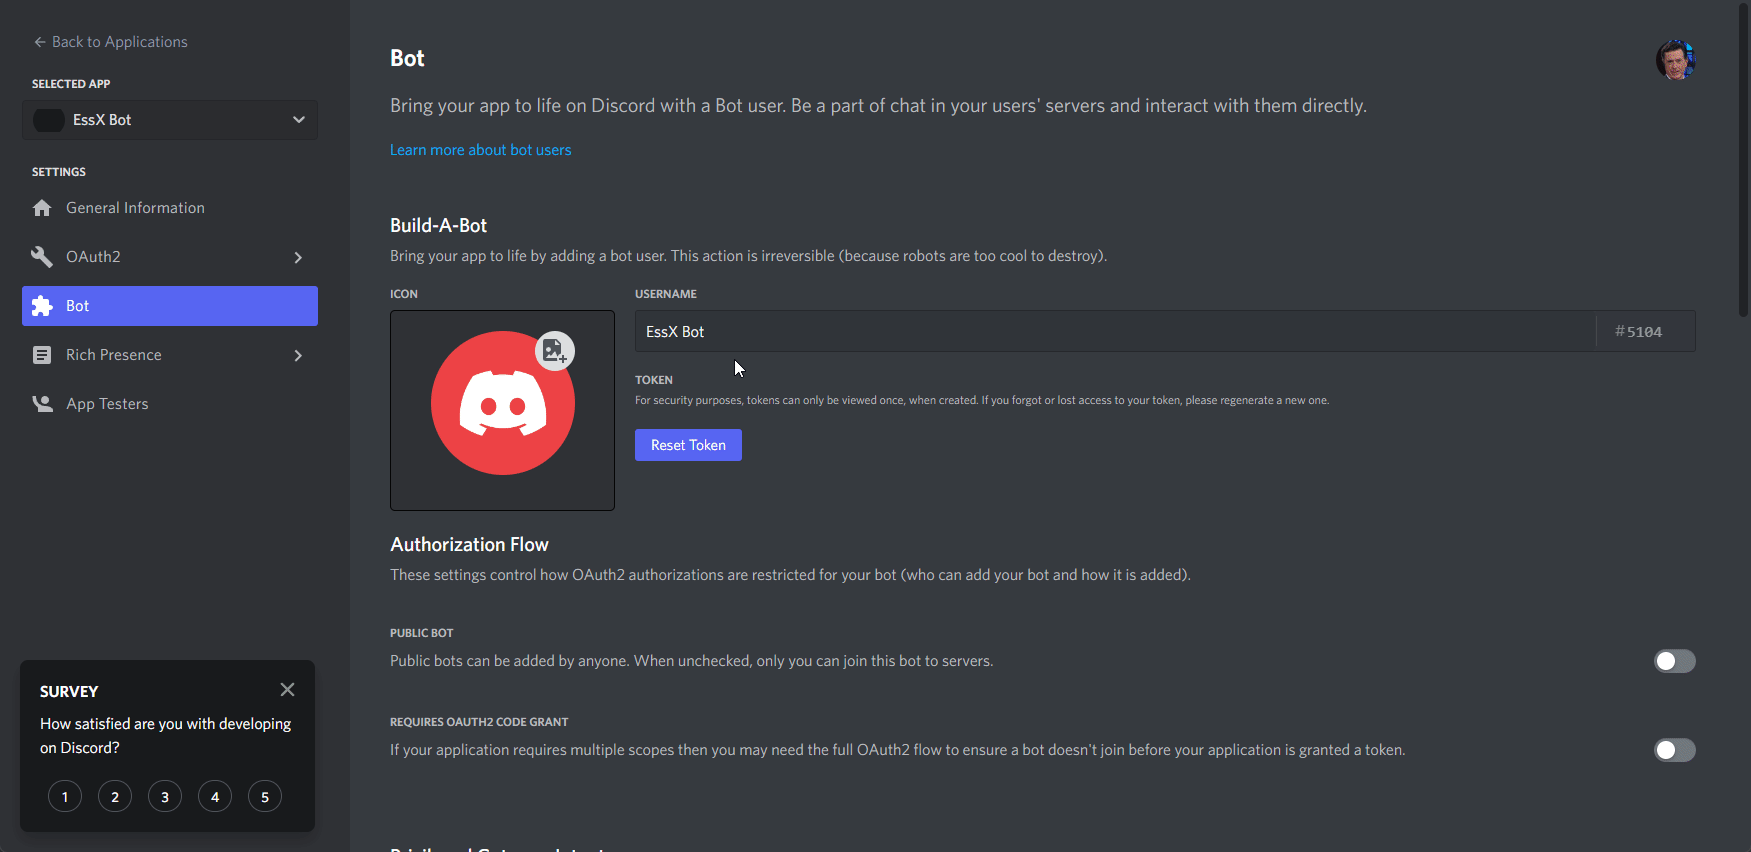
Reset Token->Yes, do it!->Copy-> Paste into Notepad for later step
- Next up is adding your bot to your Discord server. First, go to essentialsx.net/discord.html
and paste your Client ID you copied from step 2 into the text box on that page. Once you do that, click
the "Authorize" button next to the text box. This will redirect you to Discord's authorization website
to chose which server to add the bot to.
Note for advanced users: Please use the
essentialsx.netlink above even if you already know how to invite bots. EssentialsX Discord requires more than just thebotscope to work.
Paste Client ID ->
Authorize
- Once on the Discord authorization website, select the server from the "Select a server" dropdown that you want to add the bot to. Then click the "Authorize" button. You may be prompted to confirm you are not a bot, proceed with that like you would any other captcha.
Select Server ->
Authorize
For the next few steps, you're going to need to do some stuff in Discord, so start up your Discord desktop/web client.
Once in your Discord client, you'll need to enable Developer Mode. Do this by going into the Settings, then go to the "Advanced" tab and check on the "Developer Mode" at the bottom of the page. Once you've checked "Developer Mode" on, click the
Xat the top right to exit Settings.
User Settings->Advanced-> CheckDeveloper Mode-> Exit Settings
- Next is copying a few IDs. First up, you'll want to copy the server (aka guild) id. Do this by finding the server you added the bot to, right click its icon, and click "Copy ID". Once you copied it, make sure to save it for a later step.
Right click server ->
Copy ID-> Paste into Notepad for later step
- The other ID you need to copy is the ID of the channel you wish to be your primary channel. In other words, this will be the channel that, by default, receives messages for player chat/join/leave/death messages as well as mute/kicks. To see how to further configure message types, see Configuring Messages.
Right click your 'primary' channel ->
Copy ID-> Paste into Notepad for later step
- You've successfully copied all the necessary IDs needed for a basic setup. Next up is generating the default config for EssentialsX Discord, so you can start setting it up! Do this by putting the EssentialsX Discord jar (you can download it here if you do not already have one) in your plugins folder, starting your server, and then stopping it as soon as it finishes starting up.
Drag EssentialsXDiscord jar into plugins folder -> Start Server -> Stop Server
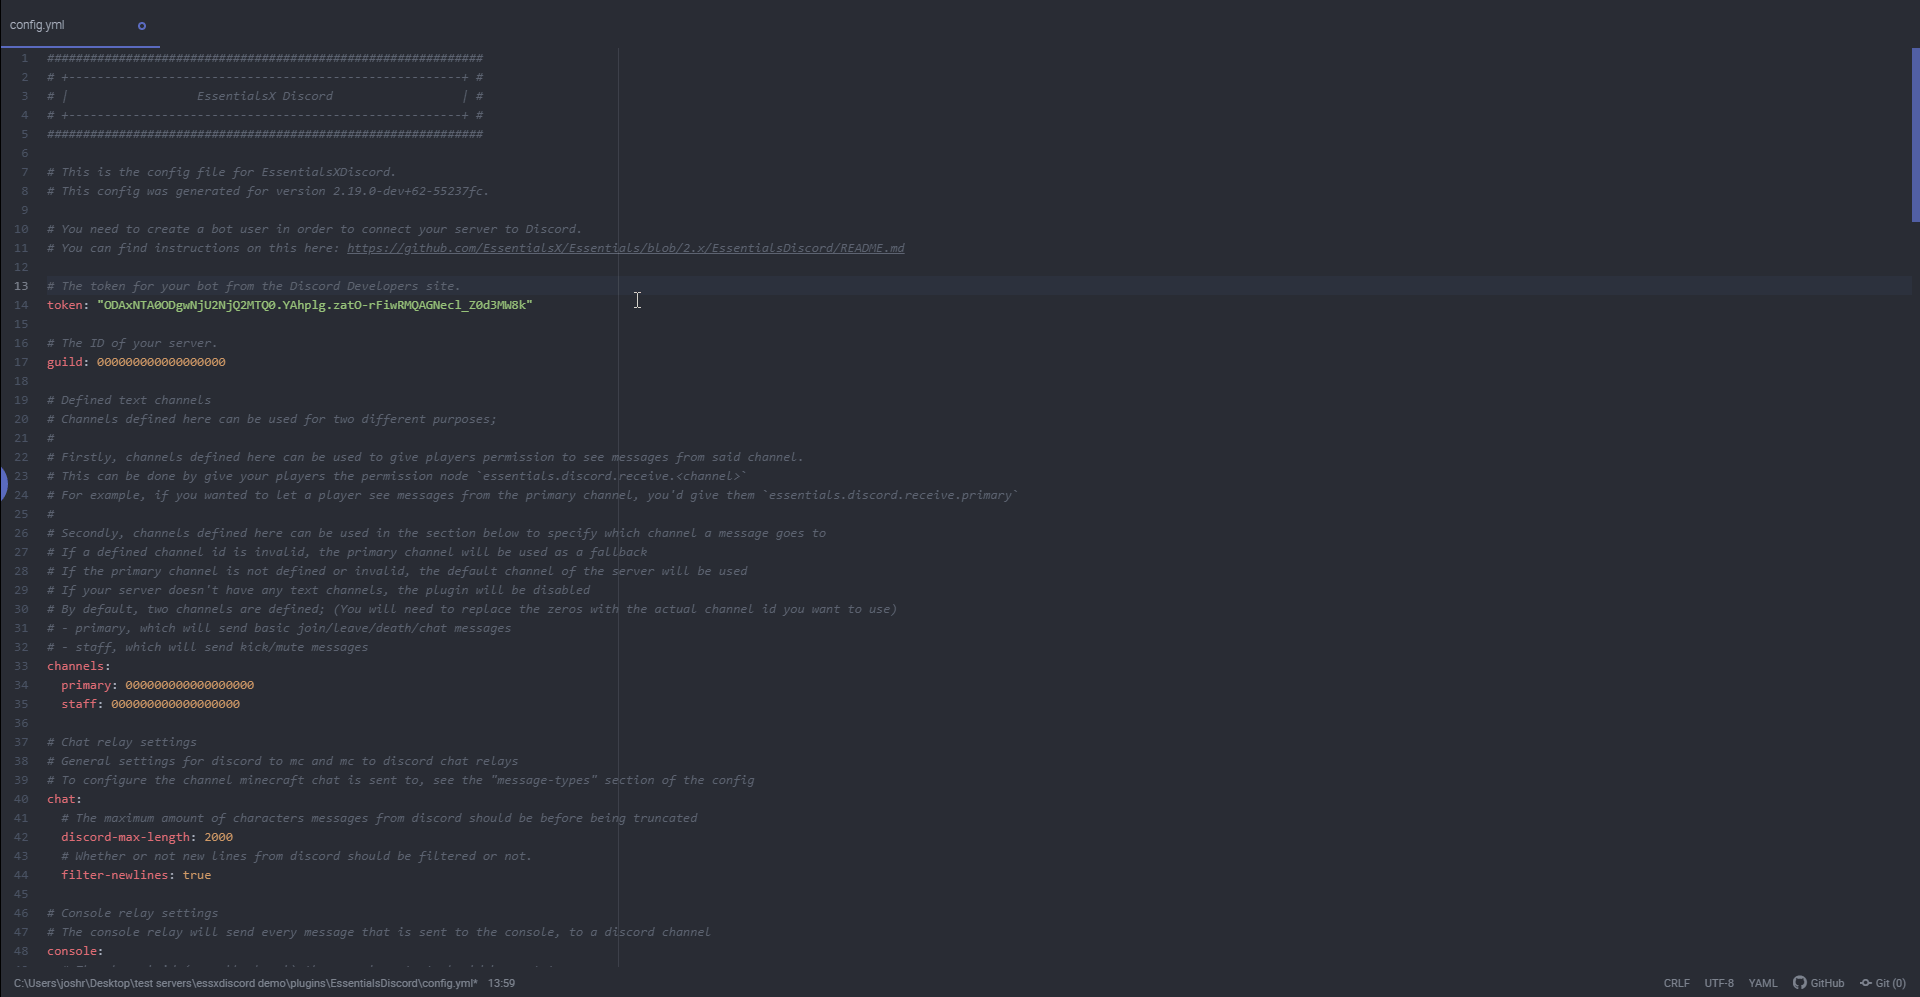
- Now you can start to configure the plugin with all the stuff you copied from earlier. Open the config
for EssentialsX Discord located at
plugins/EssentialsDiscord/config.yml. When you open the config, the first thing to configure is your bot's token. ReplaceINSERT-TOKEN-HEREin the config with the token you copied earlier from step 6.
Re-Copy Token from Step 6 -> Paste as token value
- Next is the guild ID. Replace the zeros for the guild value in the config with the guild ID you copied from step 13.
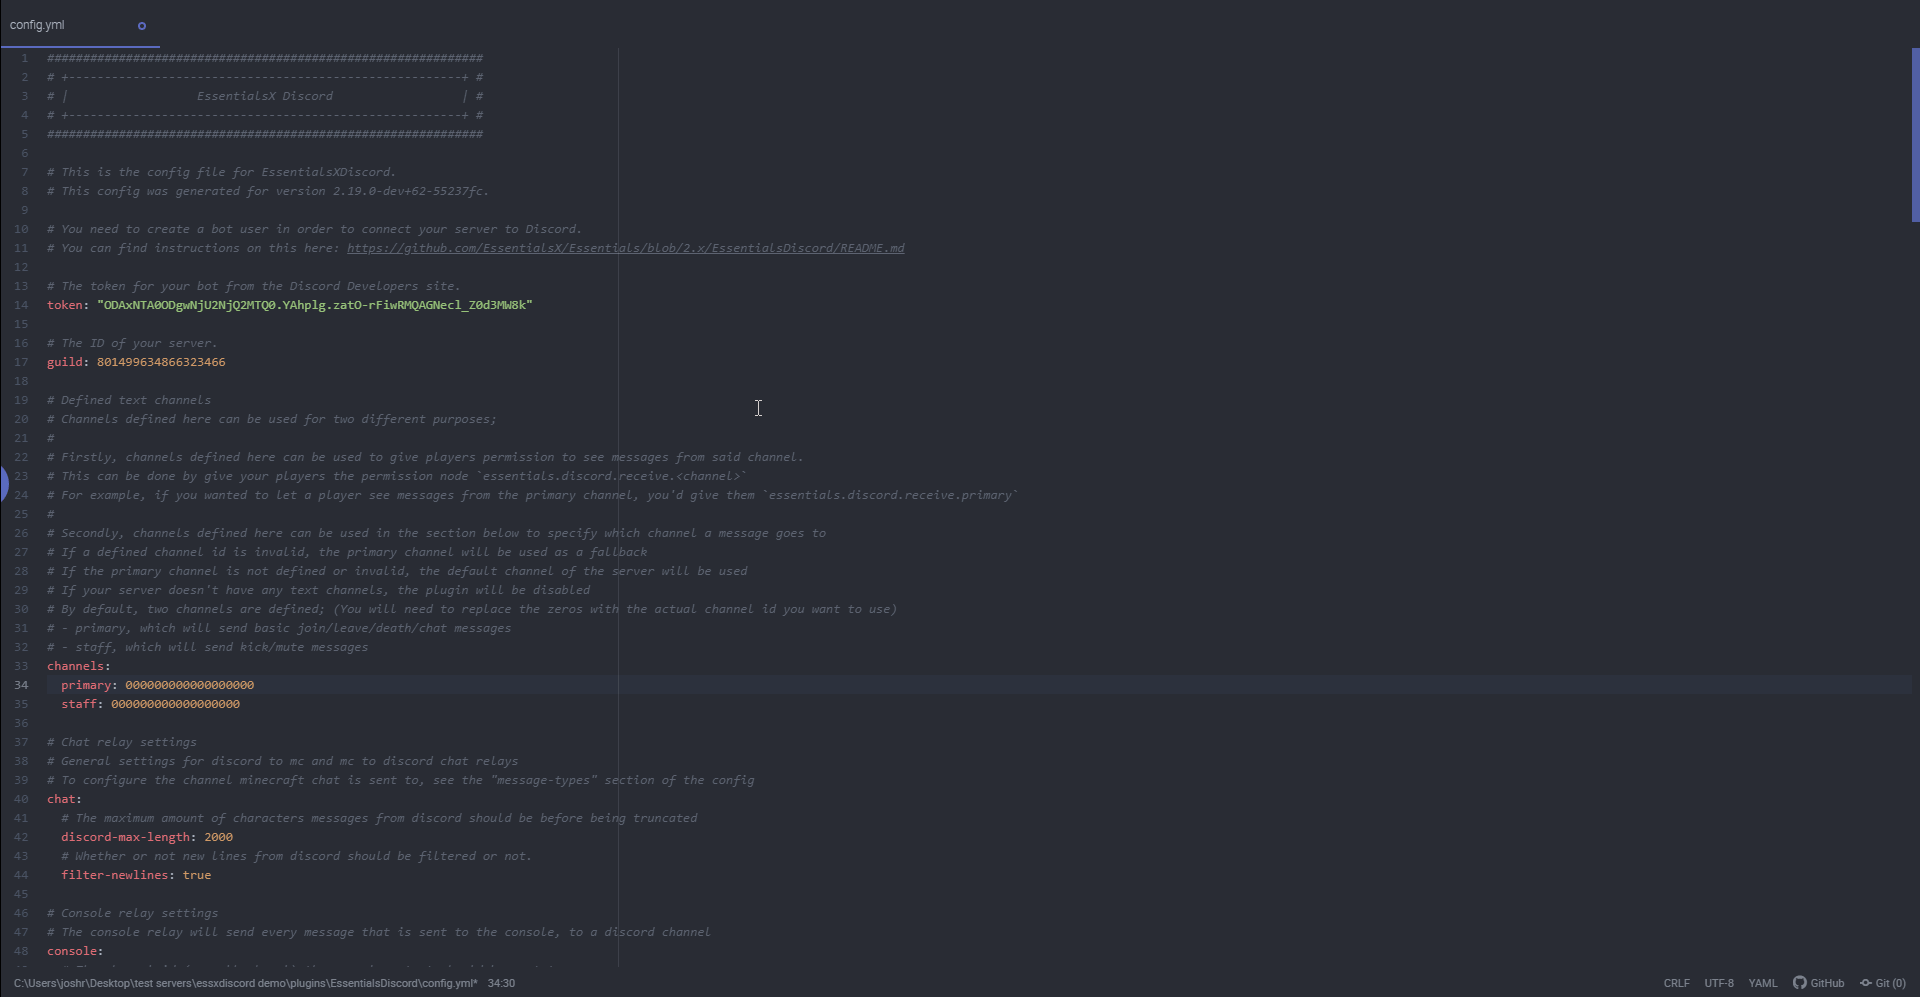
- Finally, you'll need to paste the primary channel ID you copied from step 14 and paste it as the primary value in the channels section and once you've done that save the config file!
- Congratulations, you've completed the initial setup guide! When you start up your server, you should notice that chat and other messages start showing up in the channel you requested they be. Now that you completed the initial, go back up to the Table Of Contents to see what other cool things you can do!
Console Relay
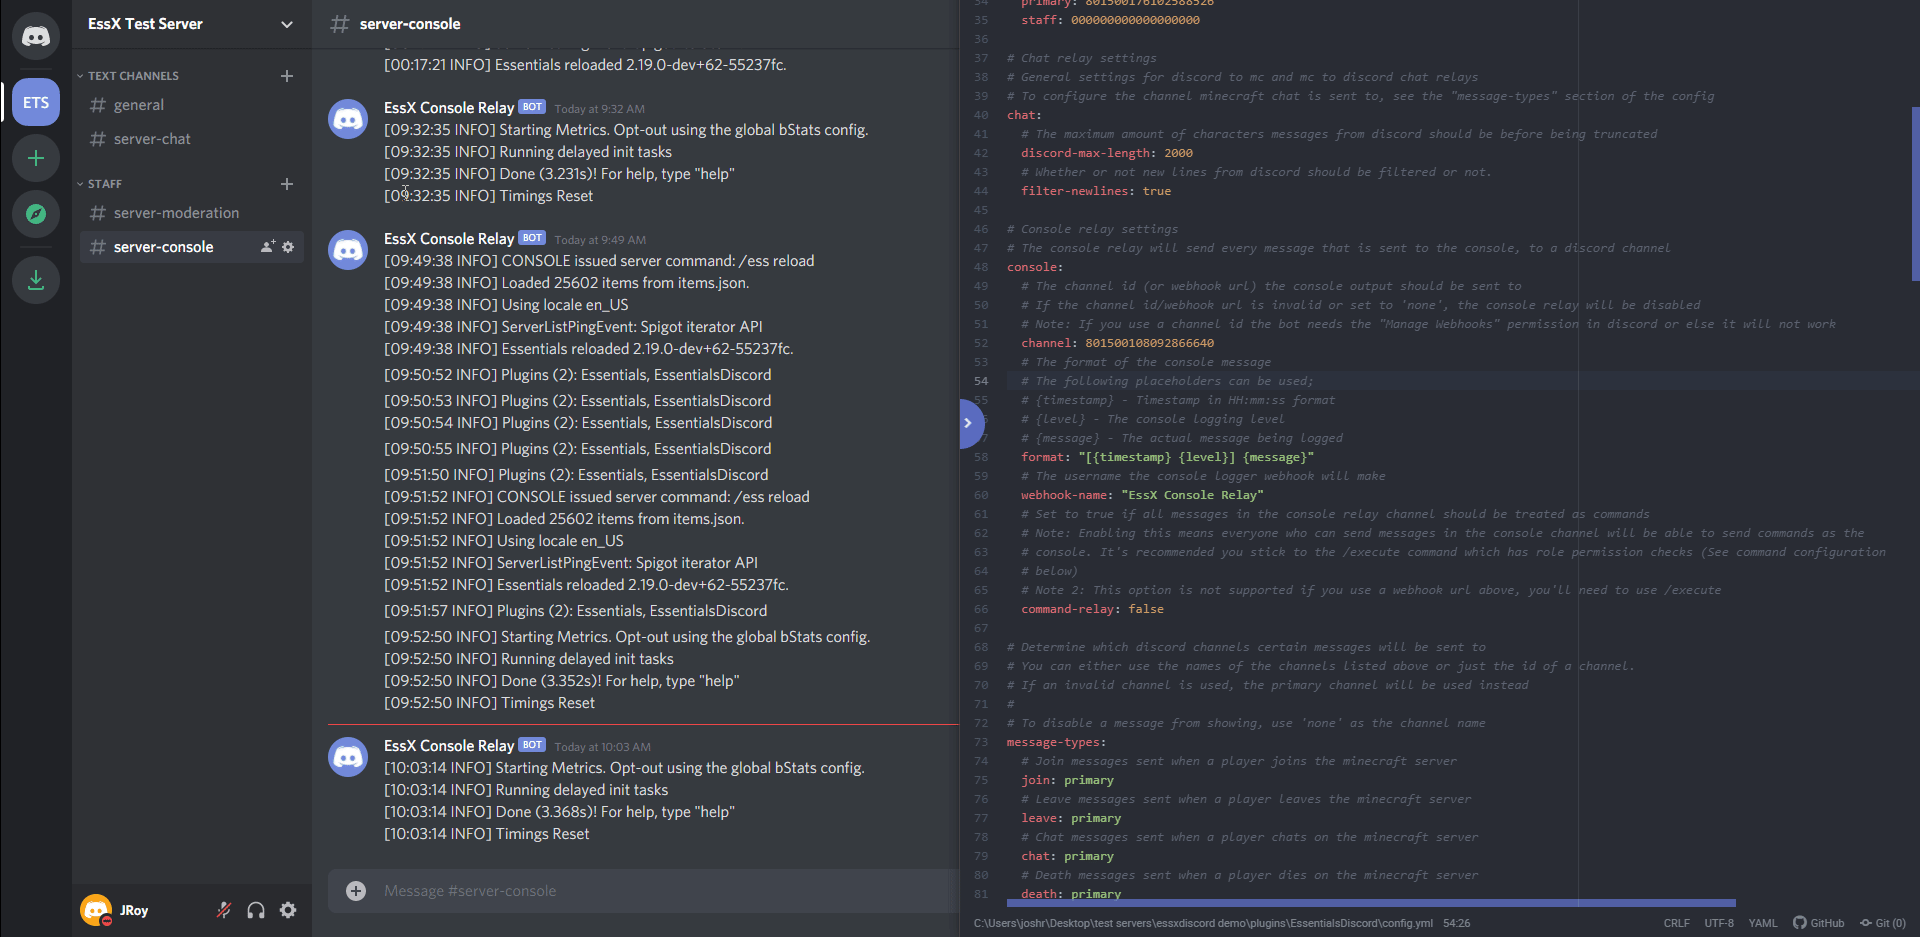
The console relay is pretty self-explanatory: it relays everything on your console into a Discord channel of your choosing. The console relay is ridiculously easy to set up and if your server is already running, you don't need to reload it!
This assumes you've already done the initial setup.
Go to the Discord server that your bot is in and find the channel you wish to use for console output. Right-click on the channel and click "Copy ID". Save this ID for the next step.
Find console channel -> Right Click ->
Copy ID
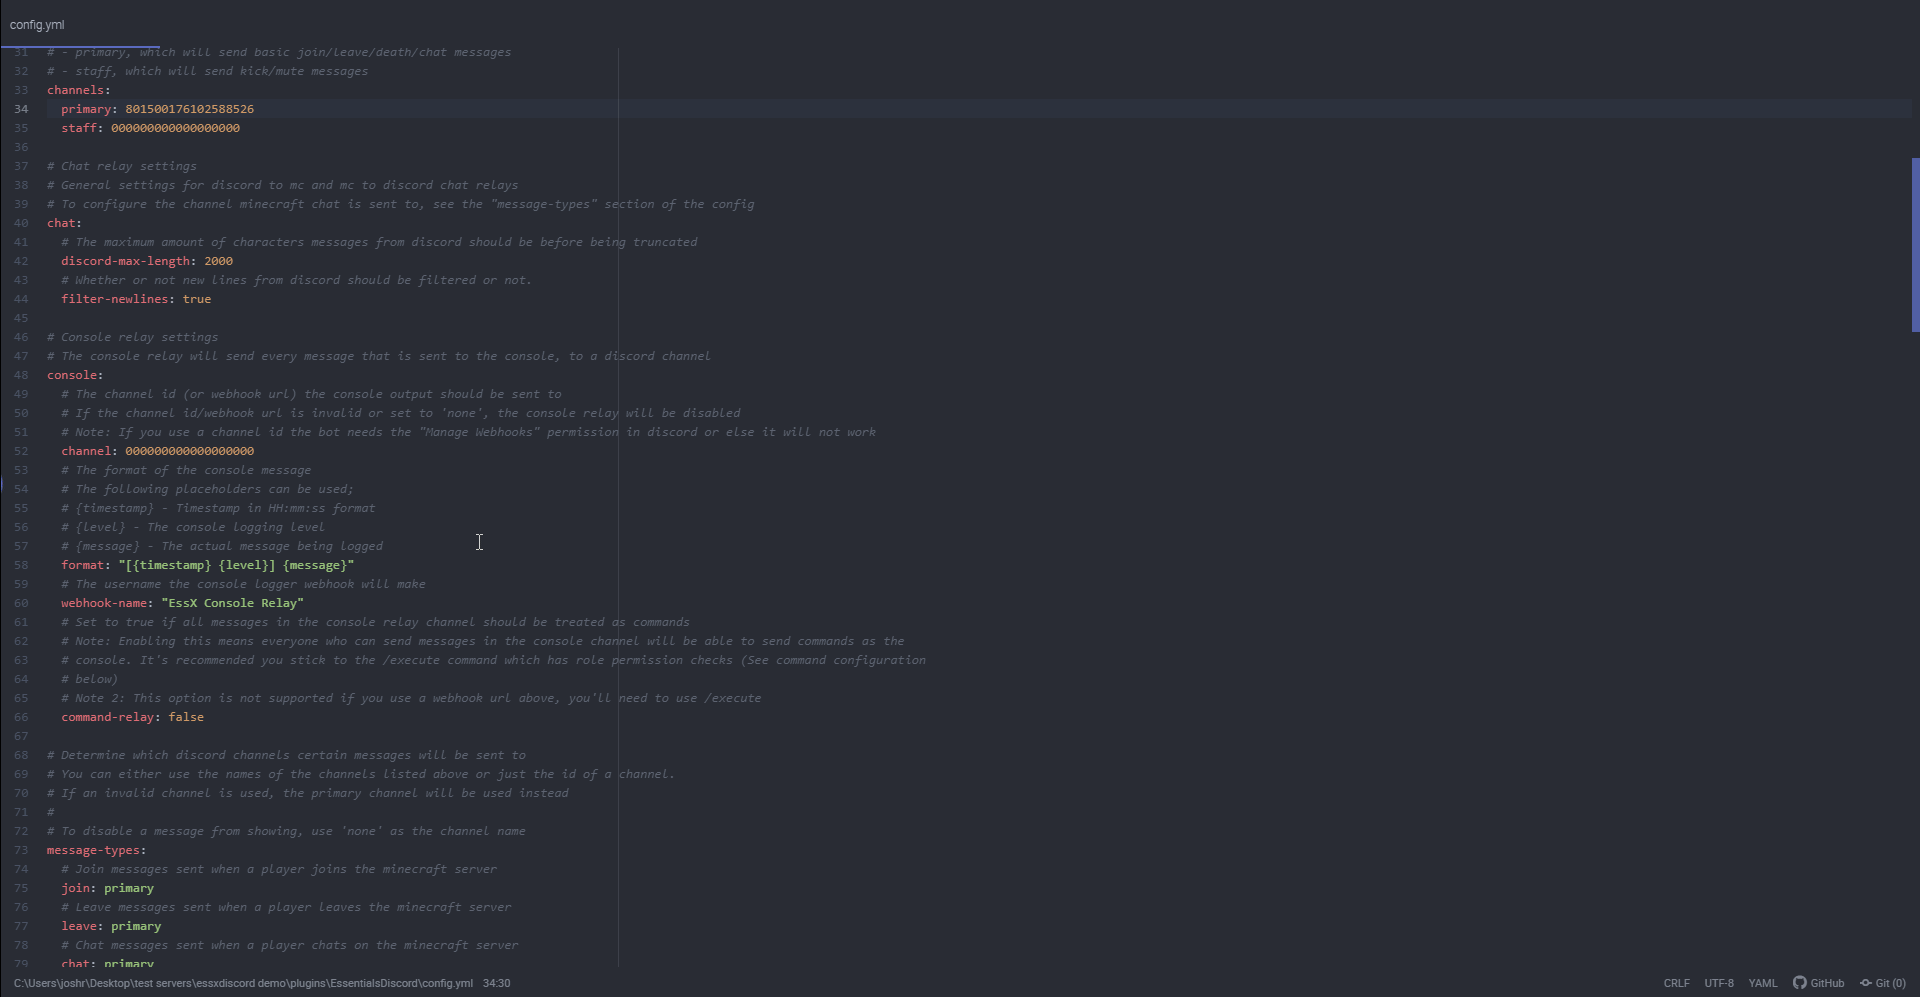
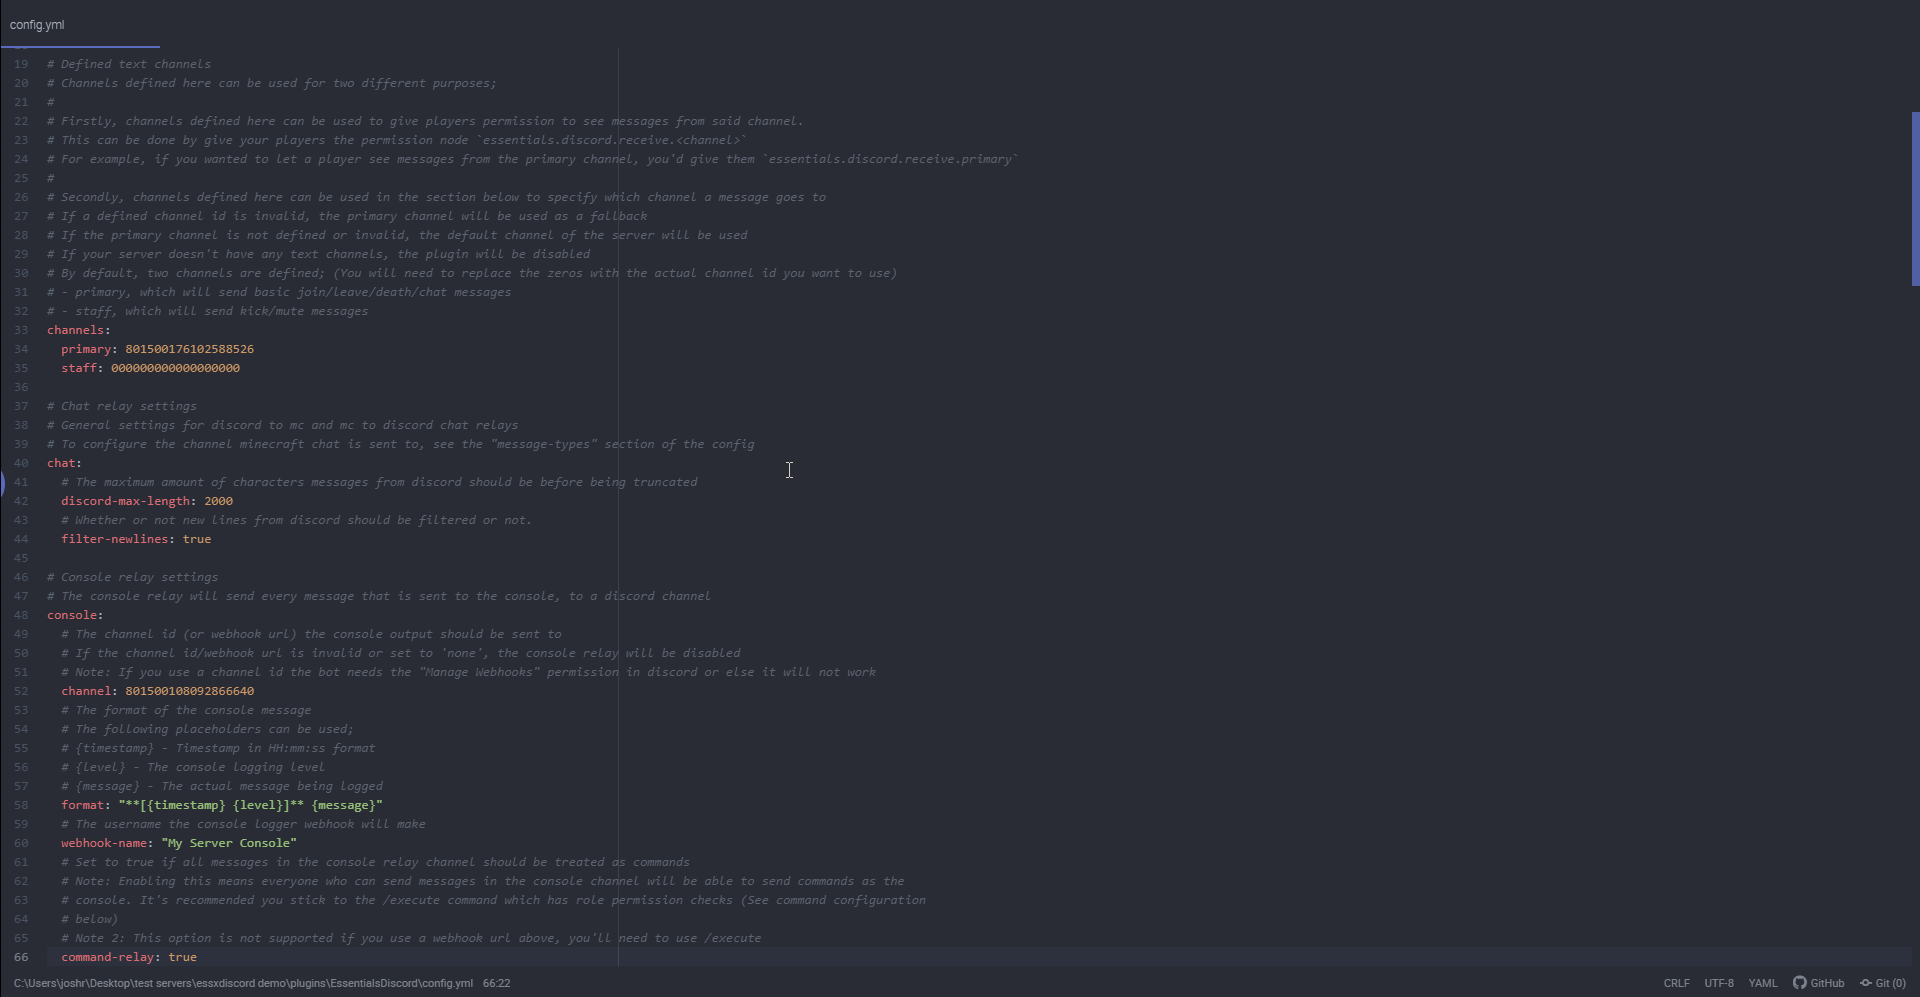
- Now that you have that copied, open the EssentialsX Discord config and find the
consolesection. In that section, replace the zeros for thechannelvalue with the channel ID you copied from the last step. Once you paste it, make sure you save the config.
Finally, if your server is running, run
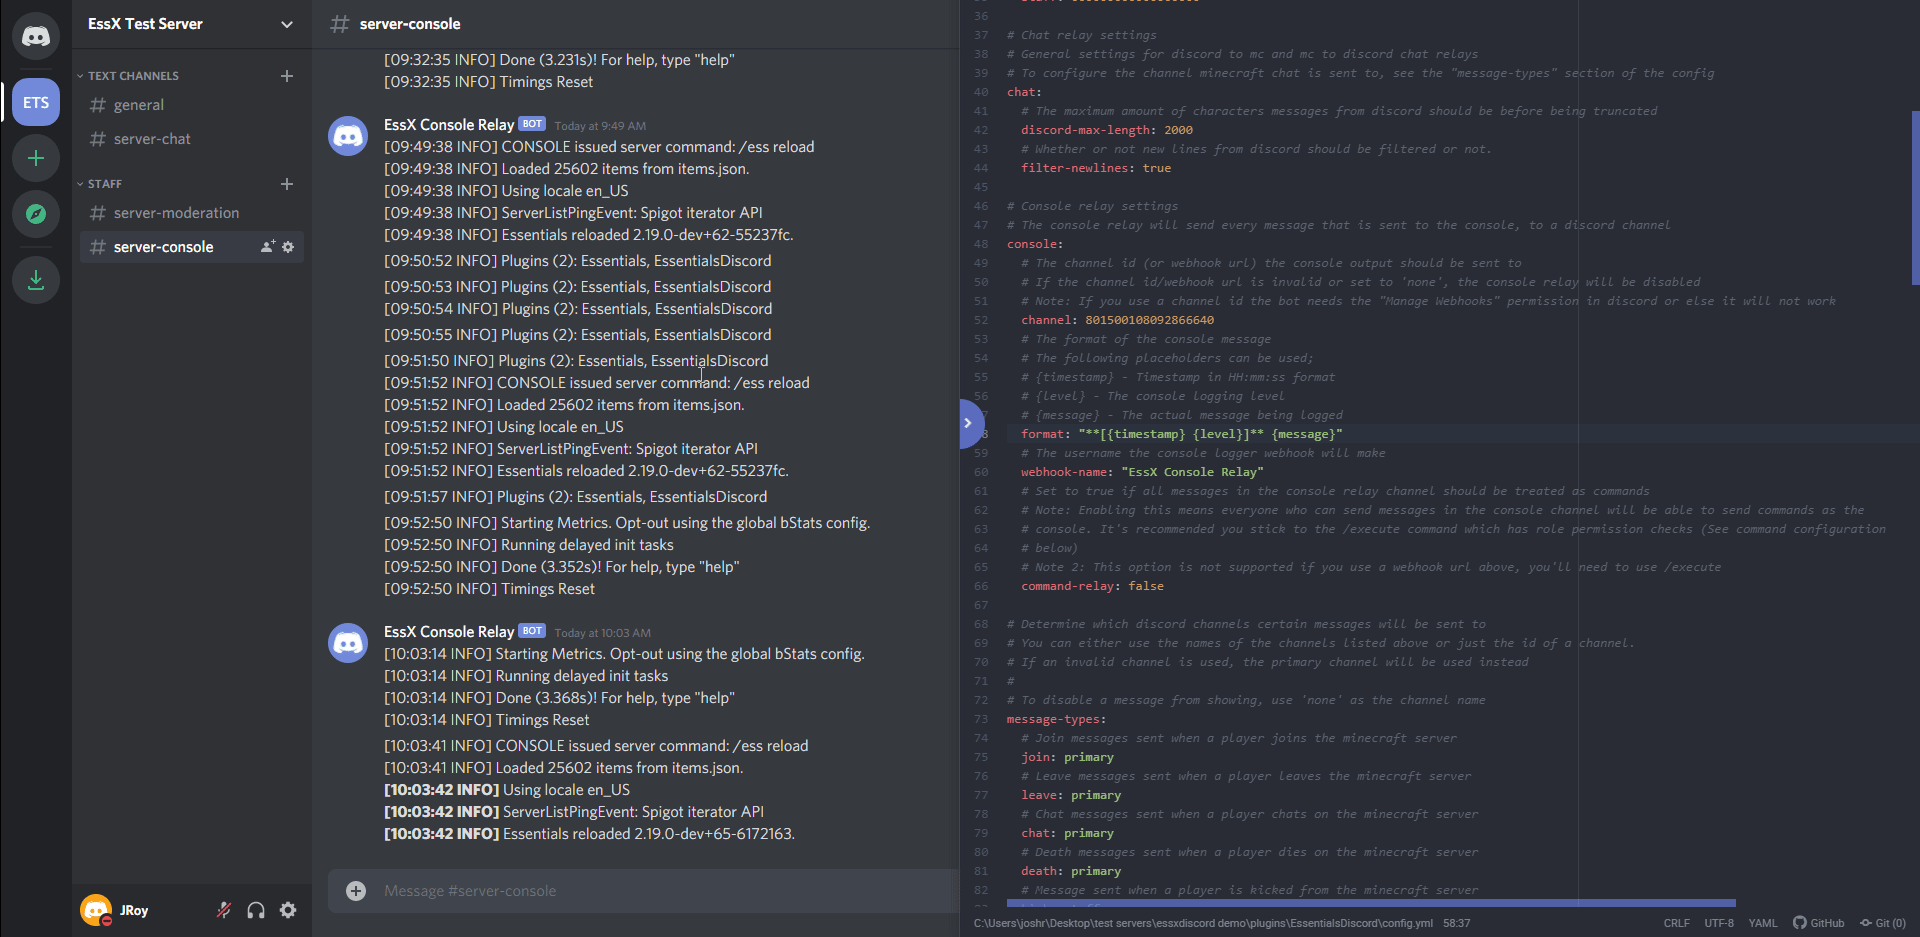
ess reloadfrom your console, otherwise start up your server. You should notice console output being directed to that channel! That is all you need if you're okay with the default settings. Otherwise, if you'd like to see what other options you can use to customize console output, stick around.The first thing you can customize is the format of the message sent to Discord. By default, the timestamp, level (info/warn/error/etc.), and message are shown for each console message. Let's say you wanted to make the timestamp and level bold: since this message would be using Discord's markdown, we can just add ** to both sides of level and timestamp. Then, once you've done that, just do
/ess reloadand you should see your changes on Discord.
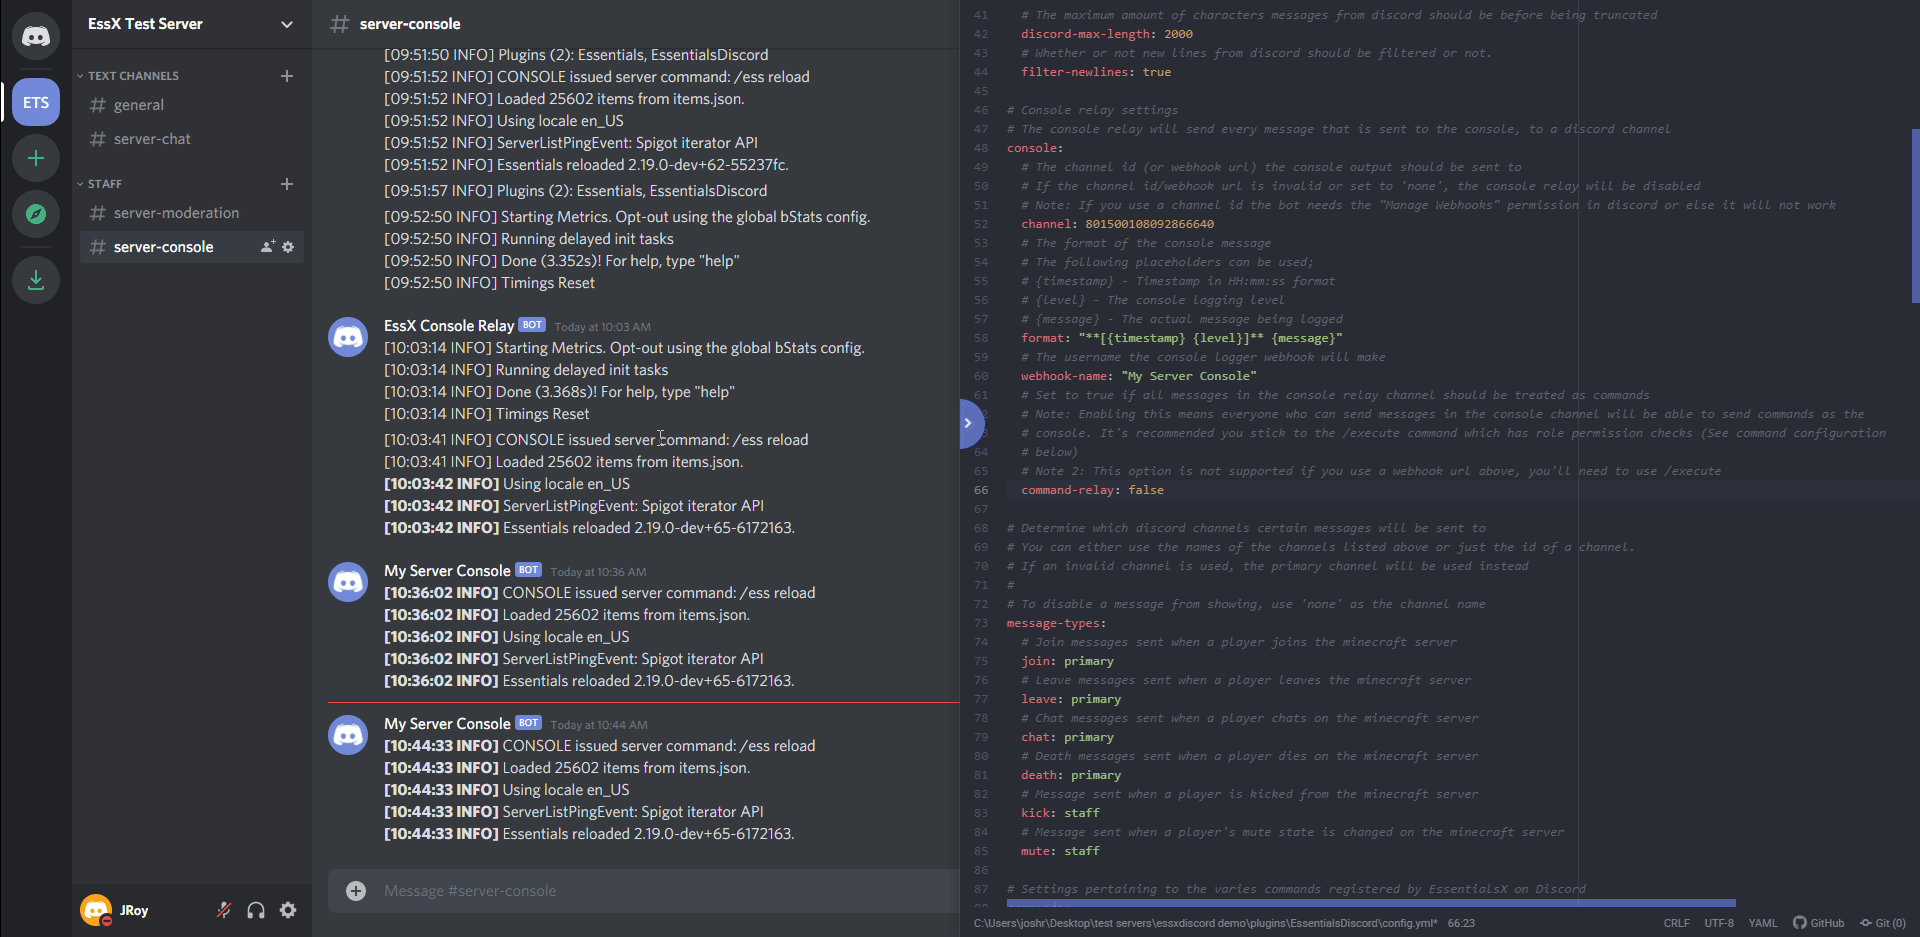
- Next, you can also configure the name you wish the to show above console messages. By default, it's "EssX Console Relay" but can be switched to anything you want.
- Finally, you can also choose to enable an option to treat any message by a user in the console channel as a
console command. This will mean that anyone who can send messages in your console channel will be able to execute
commands as the console. It is suggested that you stick to the regular
/executecommand (see Discord Commands) as those can be restricted to specific roles/users and are also not restricted to the console channel.
- That's all the options for the command relay!
Configuring Messages
EssentialsX Discord aims to keep its message-type system basic enough that simple things take little changes, while giving more fine grain control to those you want it.
To give you a general overview of the system, EssentialsX Discord allows you to define different channel IDs in the
channels section of the config. By default, two channels are pre-populated in the channels section, primary
and staff. If you only completed the initial setup, the staff channel definition is all zeros. This is fine in
most situations however, as the message system will always fallback to the primary channel if a channel ID is
invalid.
Now on to the types of messages you can receive themselves (which is where you're going to use these channel
definitions). In the message-types section of the config, you can see a list of message types (join/leave/chat/etc.)
on the left (as the key), and on the right there is a channel definition.
For the sake of example lets say we want to send all chat messages to their own channel. We can do this by creating
a new channel definition and setting the chat message type to said channel definition. Below are step-by-step
instructions for said example, you can follow along to get the gist of how to apply this to other use cases
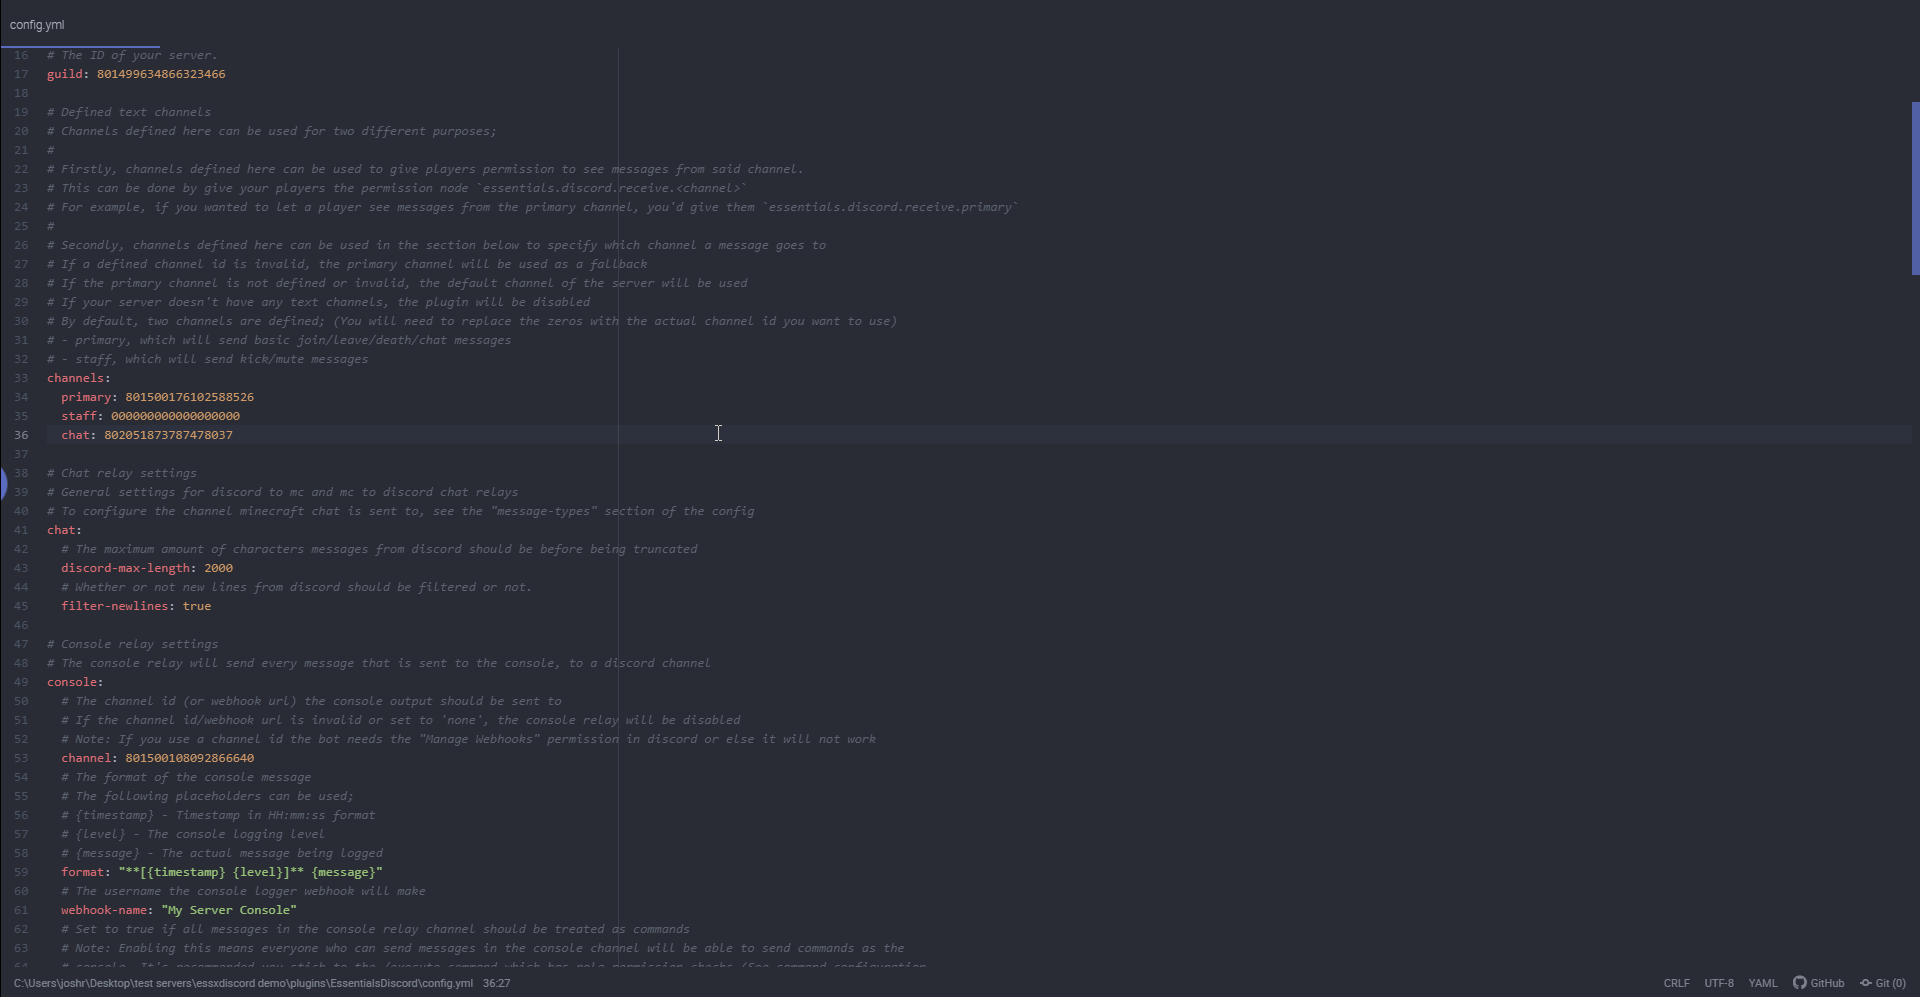
- Find the channel on Discord you want to only send chat messages to, and then right-click the channel and click "Copy ID".
- Next you need to create the actual channel definition, for this example we'll call it
chat. You create a channel definition by adding a new entry to thechannelssection with the key as its name and the ID as the one you copied in the last step.
- Finally, scroll down to the
message-typessection and change thechatmessage type to your newly created channel definition. Once you do that, save and either run/ess reloadif your server is running or start your server.
- That's all you need to know about the basics of the message system!
Receive Discord Messages in Minecraft
After reading the configuring messages section, you should now have a few Discord
channels defined in the channels of your config. You're probably wondering how you can let your players start
to see messages from Discord in Minecraft chat. Say I defined a channel named chat in the channels section
of your config, and I wanted to let players see Discord messages from that channel in Minecraft chat; This can
be accomplished very simply by giving players the essentials.discord.receive.chat permission. This would relay
all Discord messages from the chat channel to players with that permission. Another example: say I have a staff
channel in Discord that I want only staff members in the Minecraft server to see. Provided there is a staff
channel defined in the channels section of the config, I can give staff members the
essentials.discord.receive.staff permission, and they will start to see messages from that channel.
Discord Commands
EssentialsX Discord uses Discord's slash command system to let you type commands into Discord without it being seen by other people in the server. With this system, you are able to execute console commands, message players, and see the current player list.
For example, here's what the /execute command looks like by default:
As you can see, you can seamlessly run commands without people seeing the content of your commands or their response. Additionally, you can also delete the responses once you're done looking at them, so they don't clutter your chat.
However, this is all configurable! In the commands section of the config, lies a ton of options to configure
settings on a per-command basis. Below are explanations of what all the configuration options mean and how to use
them.
enabled- Default:
true - Description:
Whether or not the command should be enabled and therefore shown on Discord. Note that you must restart your Minecraft server before this option takes effect.
- Default:
hide-command- Default:
true - Description:
Whether other people should not be able to see what commands you execute. Setting to false would allow people in the same channel as you to see exactly what command you execute. In the example below, you can see how disabling this option shows a message of the user and the command they executed. - Example:
- Default:
allowed-roles- Description:
A list of user IDs or role names/IDs that are allowed to use the command. You can also use '*' in order to allow everyone to use the command.
- Description:
admin-rolesA list of user IDs or role names/IDs that have extra features in the command. For example, in the list command, admin-roles allows people to see vanished players.
Misc Permissions
EssentialsX Discord has a few other permissions that may be important to know about:
essentials.discord.markdown- Allows players to bypass the Markdown filter, so that they can bold/underline/italic/etc. their Minecraft chat messages for Discord.essentials.discord.ping- Allows players to bypass the ping filter, so that they can ping @everyone/@here from Minecraft chat.
Developer API
EssentialsX Discord has a pretty extensive API which allows any third party plugin to build their own integrations into it. Outside the specific examples below, you can also view javadocs for EssentialsX Discord here.
Sending Messages to Discord
EssentialsX Discord organizes the types of messages that can be sent along with their
destination on Discord under the message-types section of the config.yml. The
EssentialsX Discord API uses message-types to resolve the channel id you want to send your
message to.
Using a built-in message channel
EssentialsX Discord defines a few built in message-types which you may fit your use case
already (such as sending a message to the MC->Discord chat relay channel). The list of
built-in message types can be found at MessageType.DefaultTypes.
Here is an example of what sending a message to the built-in chat channel would look like:
// The built-in channel you want to send your message to, in this case the chat channel.
final MessageType channel = MessageType.DefaultTypes.CHAT;
// Set to true if your message should be allowed to ping @everyone, @here, or roles.
// If you are sending user-generated content, you probably should keep this as false.
final boolean allowGroupMentions = false;
// Send the actual message
final DiscordService api = Bukkit.getServicesManager().load(DiscordService.class);
api.sendMessage(channel, "My Epic Message", allowGroupMentions);
Using your own message channel
If you want to create your own message type to allow your users to explicitly separate your
messages from our other built-in ones, you can do that also by creating a new
MessageType.
The key provided in the constructor should be the key you'd like your users to use in the
message-types section of our config. This key should also be all lowercase and may contain
numbers or dashes. You can also put a Discord channel ID as the key if you'd like to
have your users define the channel id in your config rather than ours. Once you create the
MessageType, you will also need to register it with Essentialsx Discord by calling
DiscordService#registerMessageType.
Here is an example of what sending a message using your own message type:
public class CustomTypeExample {
    private final DiscordService api;
    private final MessageType type;

    public CustomTypeExample(final Plugin plugin) {
      // Gets the EssentialsX Discord API service, so we can register our type and
      // send a message with it later.
      api = Bukkit.getServicesManager().load(DiscordService.class);

      // Create a new message type for the user to define in our config.
      // Unless you're putting a discord channel id as the type key, it's probably
      // a good idea to store this object, so you don't create it every time.
      type = new MessageType("my-awesome-channel");

      // Registers the type we just created with EssentialsX Discord.
      api.registerMessageType(plugin, type);
    }

    @EventHandler()
    public void onAwesomeEvent(AwesomeEvent event) {
      // Set to true if your message should be allowed to ping @everyone, @here, or roles.
      // If you are sending user-generated content, you probably should keep this as false.
      final boolean allowGroupMentions = false;
      // Send the actual message
      api.sendMessage(type, "The player, " + event.getPlayer() + ", did something awesome!", allowPing);
    }
}
Prevent certain messages from being sent as chat
Depending on how your plugin sends certain types of chat messages to players, there may be
times when EssentialsX Discord accidentally broadcasts a message that was only intended for a
small group of people. In order for your plugin to stop this from happening you have to
listen to DiscordChatMessageEvent.
Here is an example of how a staff chat plugin would cancel a message:
public class StaffChatExample {
    private final StaffChatPlugin plugin = ...;

    @EventHandler()
    public void onDiscordChatMessage(DiscordChatMessageEvent event) {
      // Checks if the player is in staff chat mode in this theoretical plugin.
      if (plugin.isPlayerInStaffChat(event.getPlayer()) ||
              // or we could check if their message started with a # if we use that
              // to indicate typing in a specific channel.
              event.getMessage().startsWith("#")) {
          event.setCanceled(true);
      }
    }
}
Additionally, you can also look at TownyChat's EssentialsX Discord hook.
Registering a Discord slash command
EssentialsX Discord also allows you to register slash commands directly with Discord itself in order to provide your users with a way to interface with your plugins on Discord!
To start writing slash commands, the first thing you'll need to do is create a slash command class. For the sake of this tutorial, I'm going to use an economy plugin as the hypothetical plugin creating this slash command.
For this slash command, I'll create a simple command to a string (for player name) and check their balance.
public class BalanceSlashCommand extends InteractionCommand {
    private final MyEconomyPlugin plugin = ...;

    @Override
    public void onCommand(InteractionEvent event) {
        // The name of the argument here has to be the same you used in getArguments()
        final String playerName = event.getStringArgument("player");
        final Player player = Bukkit.getPlayerExact(playerName);
        if (player == null) {
            event.reply("A player by that name could not be found!");
            return;
        }

        final int balance = plugin.getBalance(player);

        // It is important you reply to the InteractionEvent at least once as discord
        // will show your bot is 'thinking' until you do so.
        event.reply("The balance of " + player.getName() + " is quot; + balance);
    }

    @Override
    public String getName() {
        // This should return the name of the command as you want it to appear in discord.
        // This method should never return different values.
        return "balance";
    }

    @Override
    public String getDescription() {
        // This should return the description of the command as you want it
        // to appear in discord.
        // This method should never return different values.
        return "Checks the balance of the given player";
    }

    @Override
    public List<InteractionCommandArgument> getArguments() {
        // Should return a list of arguments that will be used in your command.
        // If you don't want any arguments, you can return null here.
        return List.of(
                new InteractionCommandArgument(
                        // This should be the name of the command argument.
                        // Keep it a single world, all lower case.
                        "player",
                        // This is the description of the argument.
                        "The player to check the balance of",
                        // This is the type of the argument you'd like to receive from
                        // discord.
                        InteractionCommandArgumentType.STRING,
                        // Should be set to true if the argument is required to send
                        // the command from discord.
                        true));
    }

    @Override
    public boolean isEphemeral() {
        // Whether the command and response should be hidden to other users on discord.
        // Return true here in order to hide command/responses from other discord users.
        return false;
    }

    @Override
    public boolean isDisabled() {
        // Whether the command should be prevented from being registered/executed.
        // Return true here in order to mark the command as disabled.
        return false;
    }
}
Once you have created your slash command, it's now time to register it. It is best
practice to register them in your plugin's onEnable so your commands make it in the
initial batch of commands sent to Discord.
You can register your command with EssentialsX Discord by doing the following:
...
import net.essentialsx.api.v2.services.discord.DiscordService;
...

public class MyEconomyPlugin {
  @Override
  public void onEnable() {
    final DiscordService api = Bukkit.getServicesManager().load(DiscordService.class);
    api.getInteractionController().registerCommand(new BalanceSlashCommand());
  }
}